

In a nutshell, depth of field (DoF) is understanding what camera lens, distance and camera settings you need in order to get the part of your picture you want in focus, in focus. More technically speaking, depth of field is defined as the distance between the nearest and furthest subjects in an image that appear “acceptably in focus”. This allows you to draw the viewers eyes directly where you want them to look as well as being massively important in large format prints, where a smaller version of a photograph may look sharp and clear, but as you increase the size you realize that what you thought was a good shot, is not.
Knowing how to use depth of field correctly in your photography will give you the ability to frame your pictures perfectly and take your pictures to another level. Applying DoF to your work will get you the most of out your camera, lenses and effort, or it will give you the understanding you need to know the limitations of your equipment. In this particular lesson, we will break down the basic understandings of the concept you you can start to apply it to your everyday planning and in later lessons we will then break it down further into more complex descriptions of terms and applications.
What exactly do we mean by Depth of Field?

A camera lens can sharply focus on objects at only one distance. All other objects then become defocused- with increasing blurriness the further you move away from the single sharp focus point. When framing your shot, you’ll need to take into consideration what is the focal point that I want of my image?
Where do I want the viewers eyes to immediately go?
With landscapes we tend to try to have one very large focus area, usually along a certain line of the horizon while trying to maintain as much of the picture’s clarity as possible. With more close up images and portraits, your focal point dictates precisely where the viewer should look, and that focus area tends to be very pronounced. When dictating where you want to have the viewer look, you then can take it a step further and decide, do I want a really strong focal point while maintaining recognition of the background objects, or do I want an extreme blur of the background objects so that the focus is on my subject only?

The above cartoon graphic is a pretty simplified explanation of DoF, but it adds a little fun to this. (I have been playing around with Adobe’s AI trying to master the language, but that’s for another discussion!) With a wide depth of field, you are wanting your subject area in focus while minimizing the amount of the surrounding image that is out of focus, like the left side of the image. On the right side of the image we are placing your focus on the cat subject, more specifically the mouth, and because the focus is on that point, all other portions of the image moving away from there becomes out of focus the further the further you get from that focal point.

Let’s take this pretty green planter of basil. In this shot, the distance between the camera and the basil is only a few meters and our f-stop is set higher to control the light entering the camera. The layout of the picture is drawing your attention to the first row of the seedlings, intricate leaf veins, the way the sun shines off the edges of the leaves and the fluffiness of the soil. As the focus is very defined front and center, you will notice that basil plants to the left and right in the front row start to turn a little out of focus towards the edges and all plants behind get further and further out of focus the farther they get away from that focal point- front and center.

The above image says ‘hey, look at the basil- look at all the basil!’. The focal point above is an example of a wider focal point. This image was taken from above at about 4 meters from the plants. A smaller f-stop was used to allow more light into the camera so that we can see the detail from the area of focus as well as the surrounding plants. The image is telling you to take appreciation of all that is going on in the scene. In looking at the picture, you can see that the center of the image is where the focus was dialed in and only towards the edges of the picture does the focus become a bit blurry. As will all photos, remember that a camera lens can only perfectly focus on one area in your photo, as we are zoomed out in this example, the center is perfectly focused, but the whole image is still within acceptable focus and recognizable.

This last example is an extremely shallow depth of field, or an extremely defined focal point. We are zoomed with very little distance between the camera and the subject. A small f-stop of 2.6 was used to control the light entering the lens and make sure we are focusing the eyes of the viewer to look at the center top leaf area of the basil and pretty much nothing else. (The back blur of the plants behind are aesthetically pleasing as well, which all plays into the shallow DoF concept) This aesthetic blur of the image causes everything else in the background to just met away and become unrecognizable the further you get from the defined point of focus.
So maybe baby basil wasn’t the ultimate best example to describe depth of field, but it’s a good start and it adds some really nice lush green color on to here! Let’s dive a little deeper into the specifics of depth of field now and the components needed to create that ultimate photo, with that focal point being exactly where you want the viewer to look.
Aperture and distance as a function of DoF

In the illustration above, we are strictly taking into a count how the change of aperture changes the depth of field when all other constraints are held constant. The change in depth of field is created by defining what aperture you want to use and the distance between you and your subject. It is also based on the focal length capabilities of the lens you are using.
Aperture is the opening in the front of your lens that lets light into the sensor or onto the film. It is also referred to as the f-stop. Much like the pupils in your own eyes, the bigger the opening the more light that shines through, the smaller the opening the less light that shines through. If you think of your eyes on a sunny day, your pupil is very small as you don’t need much light to see. The opposite is of course at night where the opening needs to be much wider to let in as much light as possible. To put a measurement on this in terms of your camera, the f-stop is opposite from what logical thought would be. The smaller the aperture the larger the f-stop the larger the aperture the smaller the f-stop.

Large apertures, which are set by smaller f-stop allow for a very shallow depth of field. While small apertures, which are set by larger f-stops produce images with a large depth of field.
Distance to your subject is also just as important. The closer you are to your subject, the smaller the depth of field, the further away you are from your subject, the larger depth of field. When you are taking a closeup, your subject is right up on your lens, the result of this is a very shallow depth of field as you have a very small and defined area that you are focusing on. When you are taking a beautiful picture of say the landscape of the mountains, your subject will be 100’s of miles away, this distance creates a very large depth of field. Did that make sense? Let’s look at a visual representation of the two, and I promise not to use basil.

The picture above is a good example of a large depth of field. We are taking in the entire scene that Bolivia has to offer; the llamas, the mountains, the blue sky, dry terrain and the lagoon. The aperture is smaller, taken at a f-stop of 22 and we have distanced ourselves quite a bit to ensure we can capture everything, most importantly the mountains in the background and present everything in the frame for the viewer to observe.

In the image above, our focus is on the llama only. We want to draw the attention from the viewer to the face of the llama, while having all other distractions (like the background) melt away. This is created by having a smaller aperture, which equates to a larger f-stop, and a smaller distance between you and your subject.
So now, hopefully you have a a better explanation of how distance and aperture affects your images. But we have not touched on the most important factor of Depth of Field…
Where do you focus to make this all come together?
DoF is rather an easy ‘concept’ to understand, but really learning where you should be focusing in your frame is where the magic happens. As you can see from the image below, the distribution of the depth of field changes as the distance between you and your subject changes. (All other conditions staying the same). You will have what is called a ‘near’ Depth of Field and a ‘far’ depth of field. When you are taking a close up photo, your near and far DoF are equal at 50%. The distance between the near DoF and far DoF is the area or zone of the image that is in acceptable sharpness.
If we move that object further away say to 5M, and we focus on the same subject your DoF ratio will change. At this distance the near DoF is 42% and the far DoF is 58%. If we move that object back even further to 10M, you have the near DoF at 34% and the far Dof at 66%. So depending on how far away the subject is that you are focusing on, your depth of field can go from a very small defined space up to infinity (this is call hyperlocal distance).

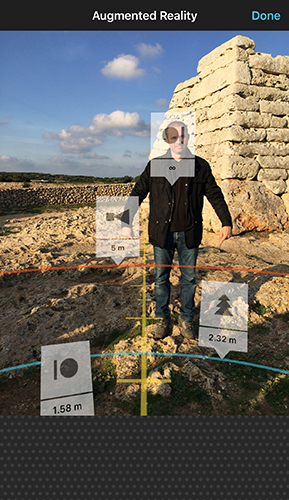
Finding the appropriate distance between you and your subject is key to getting the DoF ratio correct. There are quite a few tools that you can find online in terms of calculating appropriate focal point to create the depth of field for the image you want to take. There are also many equations you can use, but at the end of the day, if you can use an app in real-time, why bother breaking out of tape measure? The calculator below, from photopills.com is a great tool.1 You can also download their app for your phone, which currently carries a one-time activation fee. There are a lot of great things on this app like lunar and solar tracking, and augmented reality- I really do recommend it, not because I am sponsored but because I actually paid for it and use it.
The augmented reality of this app is very easy to use in the field. You define your camera model, the lens you are using and the app will help give you the relative data you need to capture your image2:


When it comes to actually measuring the distance in real life, aka- knowing where to set up your tripod versus your subject when you know the required distance to get the shot- this can be done through prior research, maps, counting the steps between you and your subject, or other apps for your phone that can help you define distance.
There are many other concepts that go into DoF, which I will break out at a later time. Hopefully this lesson gives you the basis needed to understand depth of field, and enough tools to help you go out in the field and start applying this to your photographs right now. Effectively being able to plan and incorporate DoF correctly into your images will help you be a better photographer. Yes, we can all get lucky and incorporate the correct DoF into our photographs by accident, but wouldn’t it be nice if you could correctly do it for each photograph you take?
- https://www.photopills.com/calculators/dof ↩︎
- https://www.photopills.com/sites/default/files/calculators/2019/2-dof-ar-english.jpg ↩︎
Leave a Reply